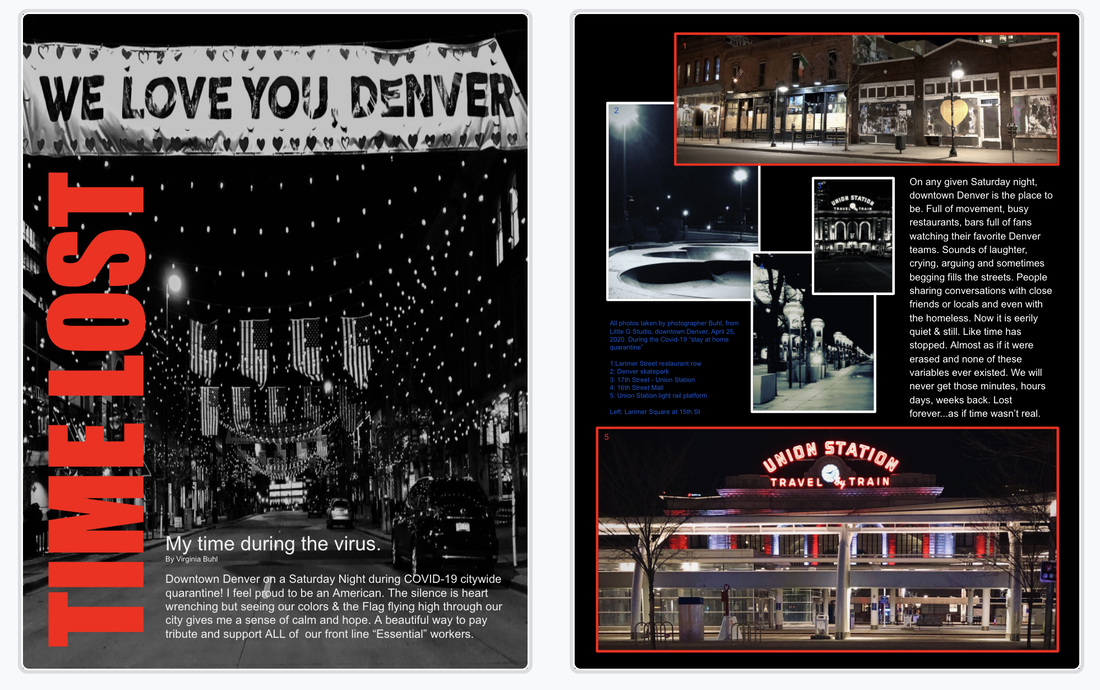
 CLO: Students will participate in the creative process (creating) by using the appropriate design technology, listening, reading or referencing tutorials to create 2 Page spread using rules of composition & photo narrative around a theme and layout design. WHAT ARE YOU LEARNING? I will be able to create a 2 page spread "NARRATIVE" using photos taken with my SLR /phone/Chromebook camera demonstrating the Rules of composition & layout design. THEME: A photo theme simply means creating a set of photographs that are related in some way, whether it be through subject, color or other reoccurring pattern. We will be focusing on subject. Use 5 photos & 3 paragraphs of you choice to document and share your experiences during "The 2020 COVID-19 Quarantine". Your theme may be fun with family, cabin fever, sadness, joy, anger, fear, anxiety, tributes etc. HOW WILL I KNOW YOU GET IT? By creating layout with a theme or specific focus. I should get a pretty good idea about what the story is about before I read the description. The photos will tell most of the story or aid in creating a feeling or emotion. Text, negative space, grid layout will make you narrative stronger. WHY IS IT IMPORTANT? It helps to be able to tayout own pictures for future jobs that may require us to do displays, flyers or update social media. Photos can help tell a story when the language between among viewers may differ. Theme helps us create focus on areas most important to the viewer. Text explain our vision. Layout design gets viewser to buy, try or remember something. MATERIALS: Medium: Your SLR camera./phone/Chromebook camera Quarantine Theme to shoot Software: Google slides, photoshop, Pixlar, Procreate The design must be original, no copyright images. Plan it out on a blank sheet of paper. Write out your copy. At least 3 paragraphs and 5 images are needed. You may split your 2 page spread into 2 different stories. You can watch video in Google classroom too. I MADE A GOOGLE SLIDE DOCUMENT FOR YOU TO USE. Choose pages you like from template. VOCABULARY: Show me how to: upload layout design from your camera/phone/Chromebook and share on Google Drive folder in Classroom. Templates will be given in your Google classroom page. Know & show: Layout composition, Theme & Rules of composition!!!!
0 Comments
Why is visual storytelling so important?
We can discuss the importance of visual storytelling all day, but what do the facts show? Studies have revealed some pretty alarming statistics about the true impact of visual content:
In the midst of a culture so saturated with images and videos, if you’re not up-to-date on visual storytelling, you’re already several steps behind competing designers looking to make some headway in the industry. RULES TO KEEP IN MIND Tell the whole story: Beginning Middle & end Remember Visual Hierarchy To make a long story short (hah!) the most important items should be closest to the top of the screen and, generally, they should also be the biggest items that the user can see. Use Light to Your Advantage No matter the color palette that a scene might be in, people are keyed into the idea that darkness conveys mystery and danger. Brightness, on the other hand, offers both safety and a sense of importance. As you present the conflict or bully, use shadows or muted colors. Think about Color Psychology Colors offer tremendous expressive opportunities. The best visual storytelling comes when you plot out each “shot,” like a director: Part of that thought process should be the right color for the right emotion. Check the Power of color meanings here. Use Visual Metaphors to Make Meaning For example, a clock represents the passage of time, while dark clouds demonstrate that stormy times are ahead. Close with Your Strongest Image While a great first impression is essential, the final image someone sees will make or break a visualized story. When you save your biggest moment to the very end, users are more likely to act on your content. 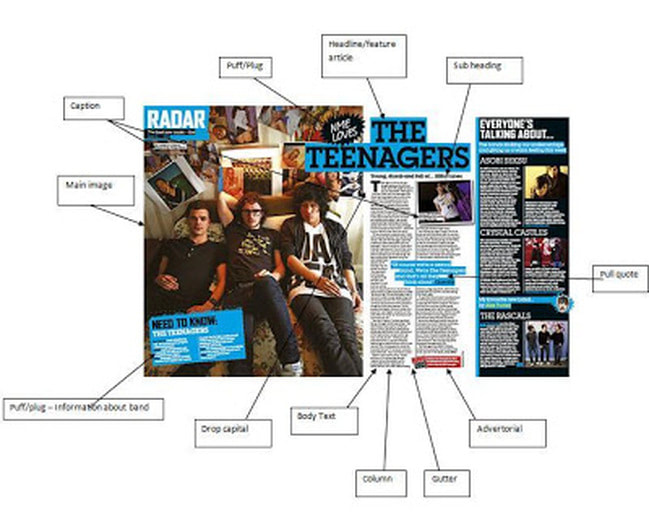 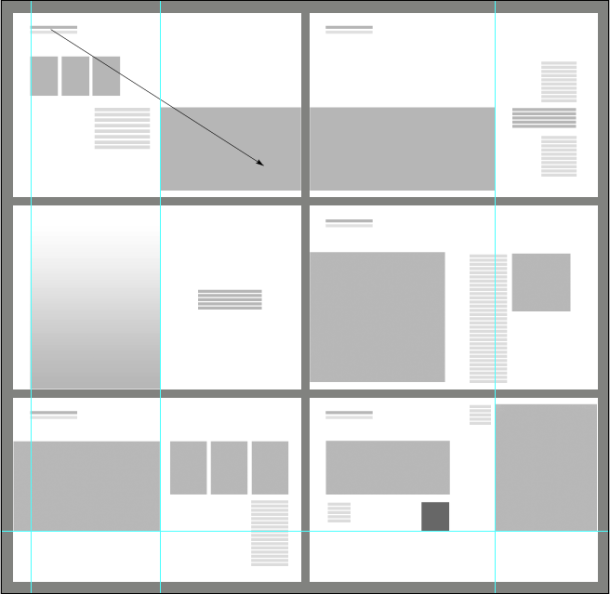 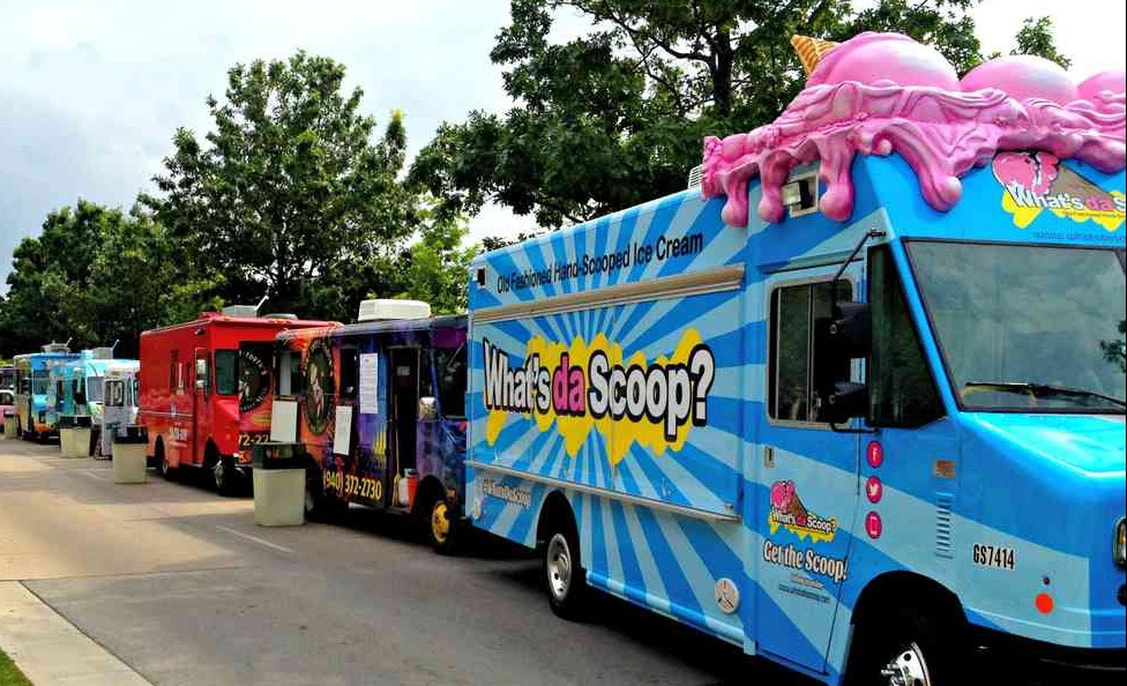 CLO: I will apply the design cycle, rules of design & brand identity to create an original concept for a food truck. I will create the logo, wrap for a truck, menu, marketing & mobile app and discuss the process with peers verbally in class and justify my decisions on Trello. I must include all details needed to sell product. WHAT ARE YOU LEARNING: I will be able to create a brand identity within specifications for a new product by using design principles and the steps of the design cycle. HOW WILL I KNOW YOU GET IT? By creating a logo using rules of design. I will use the design cycle to brainstorm, sketch at least 5 thumbnails, create and revise one idea, and justify my decisions with peers on Trello. I will revise my logo so it is versatile and then add color for truck wrap & menu. I will use the design cycle over and over until I come up with a winning concept and visual ad to sell the products on my truck. WHY IS IT IMPORTANT? Artist follow a simple set of rules and size guidelines. In order for people to understand and communicate their ideas these rules need to be considered. Brand identify is important for a product to sell and be relevant. Without the right design, your business may fail. By assigning different visual characteristics to sections of information (size, color, contrast, repetition, alignment, proximity) a designer can influence what users will perceive as being more important. REQUIREMENTS: Size: See requirements below Medium: Adobe Illustrator CS6 Adobe Photoshop CS6 Adobe Dimensions Adobe XD Corel Draw/Laser Cutter VOCABULARY: Resolution, Vector vs. Rastor, Rules of logo design: Keep it simple, timeless, memorable, versatile & appropriate. Visual Hierarchy: size, color, contrast, repetition, alignment, proximity Things to think about:
Advantages of Vector Graphics (.AI) vs Raster (.PSD)
PROJECT MUST HAVESBrainstorm, Plan and Sketch out your ideas first. Start with the concept first! Then the logo! The most time will be spent here!
(you should have about 5 sketches of your truck ideas to start) Your goal is to create a food/service truck design that is as realistic as possible. You may want to look at actual food truck designs on the internet for inspiration. It can be a service instead of food. 1- YOUR CONCEPT/LOGO DESIGN: at least 2.5x2.5 VECTOR image. It can vary based on need. It will also appear on your truck, uniforms, app & menu. You need to mock up at least 3 (b&w, 2-3 spot color, full color). ADOBE Illustrator 2- TRUCK DESIGN PLAN: use templet given to you in classroom. Start with 150 Resolution. RASTER. Fill the background with a color or a gradient that compliments your design. Truck should not be white. Do one side at a time. We will print or paint finished design. ADOBE Illustrator/Photoshop 3- MENU DESIGN: at least 8.5 x 11, 150 Resolution Printed. RASTER or VECTOR. Must include your logo design. You will be using InDesign to create a menu. Menu Board needs to be on your truck as well. This may be different than printed take away menu. ADOBE Illustrator/Photoshop/In Design 4- PRODUCT DESIGN: We will make stickers (VECTOR) from this logo as well as t-shirts, you will learn how to cut vinyl to screen print. Think about bags, plates, cups, napkins, water bottles, bas, hats etc. Use Dimensions to show mock up examples. ADOBE Illustrator/Dimensions, Silhouette Cameo 5- 3D TRUCK MODEL: use (VECTOR) templet you used from illustrator (Part 2), import into Corel draw to cut on laser cutter. You will cut out, assemble and add your printed or painted wrap. COREL DRAW - LASER CUTTER 6- MOBILE APP DESIGN: This will be the last stage of the project, you will create a mock up of what an app could look like or web page.. ADOBE XD & Weebly.com 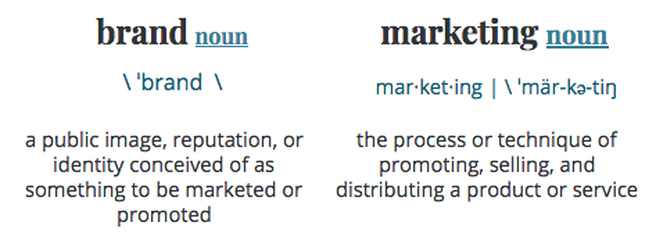 WHAT IS BRAND IDENTITY? The visible elements of a brand (such as colors, design, logotype, name, symbol) that together identify and distinguish the brand in the consumers' mind. The most commonly agreed upon elements of a brand identity usually include:
So how do you build a Brand identity that your customers can stand behind? Think of these things...
WHAT IS MARKETING?
Marketing refers to activities a company undertakes to promote the buying or selling of a product or service. Marketing includes advertising, selling, and delivering products to consumers or other businesses. Some marketing is done by affiliates on behalf of a company. Once you've defined your brand, how do you get the word out? Here are a few simple, Marketing tips: 1. Keep it clean Not too much text, and not too many graphics used in the same banner . 2. Take advantage of contrast To create contrast in your design, you can make use of size color, alignment, repetition, proximity, whitespace, and texture. 3. Limit the number of fonts you use If you don’t want to use just one font, then I recommend choosing at most a pair of fonts, so that the discrepancy between them won’t be too apparent. 4. Play with different font sizes Even if you use a single font for all your designs, you can still create distinct effects by playing with the font size. 5. Adhere to brand guidelines This means making sure that you incorporate your logo, color palette, typography, and other brand elements that are specific to your business (like an icon, a pattern, or a particular photographic style). 6. Use the psychology of color The psychology of color is about art and science combined. That’s why you need to think about the type of response you’d like from your audience and find the perfect combo between your brand’s colors and those that will help you achieve your goals. 7. Plan campaigns around holidays After you identify holidays that would work for your audience, it’s time to start designing some marketing materials around those themes, depending on what type of campaigns you thought of. Graphic design is the process and art of combining text and graphics to communicate an effective message in the design of websites, logos, graphics, brochures, newsletters, posters, signs, and any other type of visual communication. Designers achieve their goals by combining the elements and principles of graphic design. In addition to the obvious elements — images and type — graphic design Elements include lines, shapes, texture, value, size, and color. Graphic designers for print and web pages use some or all of these elements to generate effective designs. The goal is usually to attract the viewers’ attention and sometimes to motivate them to take a specific action. The elements of graphic design combine with the Principles of alignment, balance, repetition, proximity, contrast, and space to create effective page compositions. Principles of graphic design address ways in which a graphic designer can assemble the individual elements into a cohesive whole. Designers draw the viewer's attention to an important element by placing the important element in the place where the eye naturally falls. 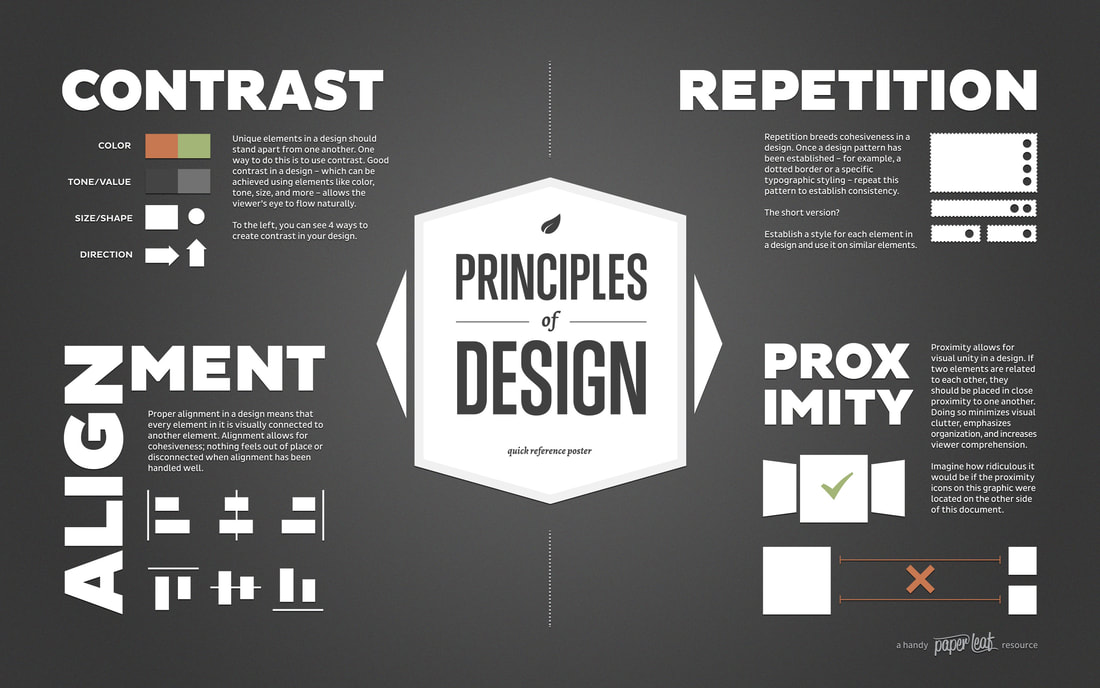 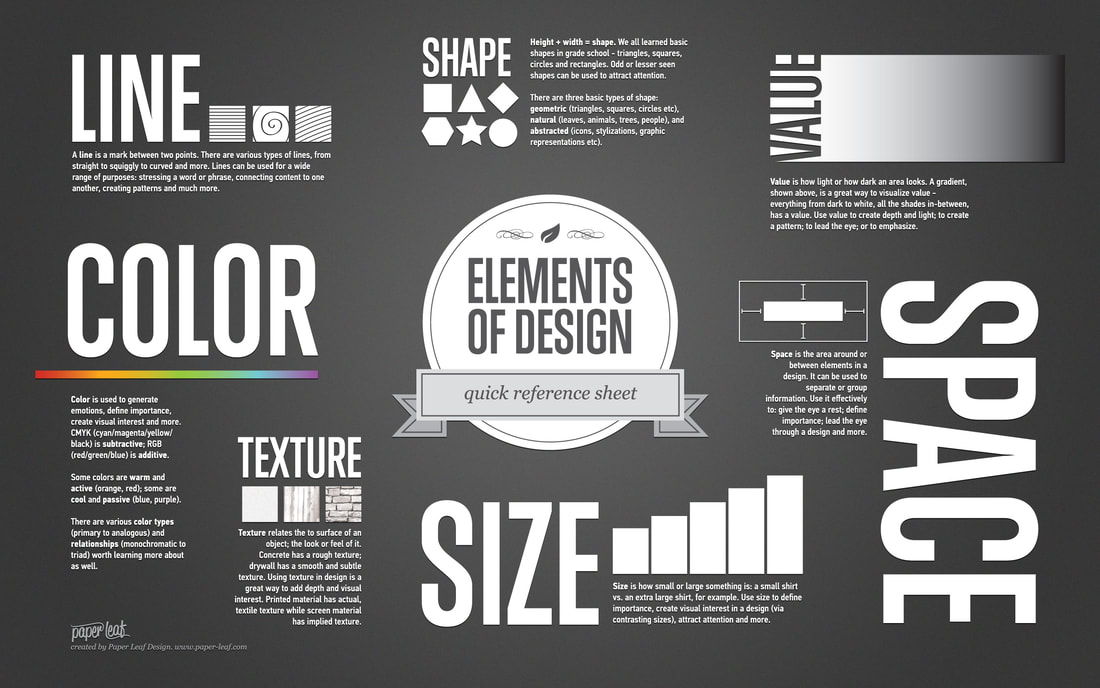 THINGS TO REMEMBER For Good Logo Design:
Color is an important consideration in your brand identity system. Colors have a significant impact on people's emotional state. Color can trigger an emotion and evoke a brand association. Color in branding is also important because our response to a color is based on our life experiences and cultural associations. 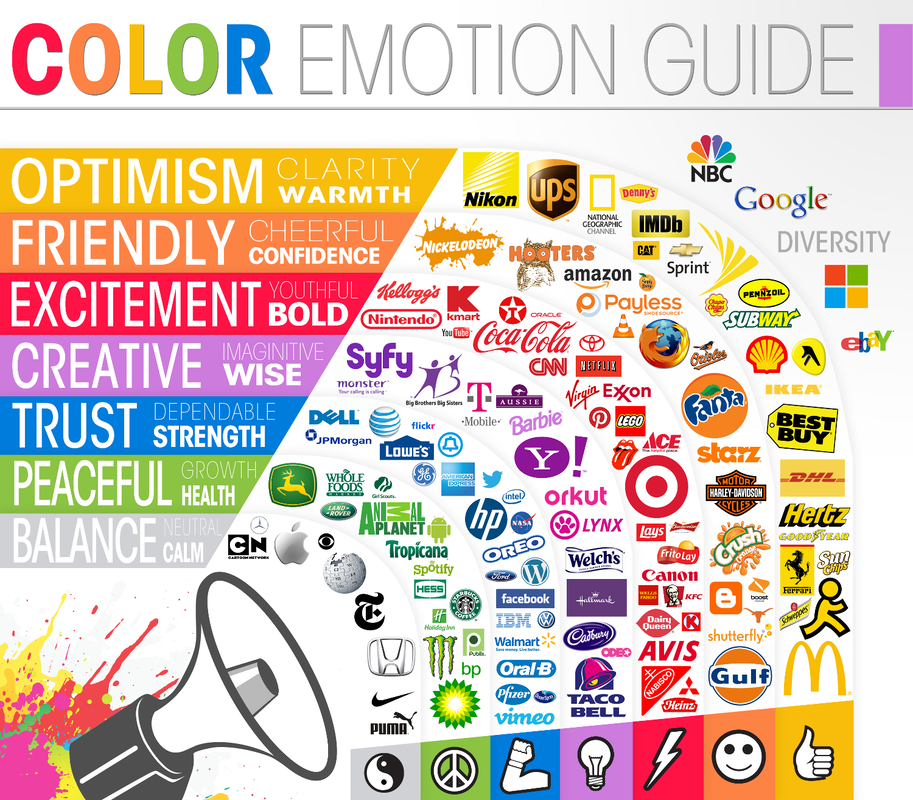 COLOR MEANINGS
CLO: Students will participate in the creative process of creating a logo from conception to final print, by researching logo design, drawing up multiple sketches & a conceptual plan for execution using Illustrator. WHAT ARE YOU LEARNING? I am learning the importance of identity, and I will learn the rules of logo design and how to brainstorm and sketch out ideas and make revisions using the design cycle. HOW WILL I KNOW YOU GET IT? I will build upon the rules of logo design and color theory to create a logo. Using the design cycle to brainstorm, draw, color , I will talk about my decisions with peers to revise my deign and set it up to print.. WHY IS IT IMPORTANT? It helps to be able to identify a product or business with just a simple look or symbol. In the real world logos are used more than product names. With social media being a visual platform, logo design is used to identify most industries today. It helps us navigate directions, buying items and even knowing the difference between a good vs. bad product. REQUIREMENTS: Size: 8.5x11 Medium: Adobe Illustrator CS6 One color: black VOCABULARY: Show me how how to brainstorm. The rules: Keep it simple, Keep it timeless, Make it memorable, Make it versatile, Make it appropriate 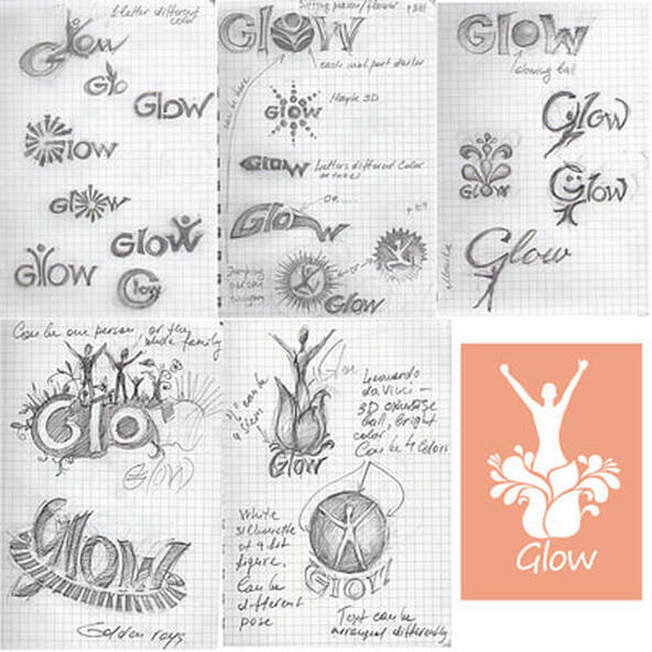 CLO: Students will participate in the creative process by using the appropriate technology, listening, reading or referencing tutorials to explore Adobe Illustrator's shape, pen & pathfinder tools. WHAT ARE YOU LEARNING? I will be able to draw using Adobe Illustrator's text, shape, stroke, fill, pen & pathfinder tools (weld & divide). HOW WILL I KNOW YOU GET IT? By creating a colored vector image using tutorials as reference. And then talk about their tool & color decisions with peers. WHY IS IT IMPORTANT? Unlike JPEGs, GIFs, and BMP images, vector graphics are not made up of a grid of pixels. Instead, vector graphics are comprised of paths, which are defined by a start and end point, along with other points, curves, and angles along the way. A path can be a line, a square, a triangle, or a curvy shape. These paths can be used to create simple drawings or complex diagrams and blown up to any size. The pathfinder tool allows you to divide shapes apart and weld them together. The pen tool allows you to manipulate a point or draw a shape. REQUIREMENTS: Size: 8.5x11 Medium: Adobe Illustrator CS6 VOCABULARY: Show me how to use: text, shape, stroke, fill, pen & pathfinder tools Difference between vector & raster images. Pathfinder tool: weld, divide Align tools, gradient, pencil tool, anchor points, custom brushes Shortcuts: copy, cut, paste, etc
 CLO: Students will participate in the creative process (researching) by using the appropriate technology, listening, reading or referencing tutorials to convert a photograph from Photoshop into a vector image in Illustrator using Adobe Illustrator's Live paint tool, pen tool, eyedropper and paint bucket. WHAT ARE YOU LEARNING? I will be able to create a cartoon portrait of myself, from my own photograph using Illustrator live paint & pen tools. HOW WILL I KNOW YOU GET IT? By creating a colored vector image from my own photo, using the design cycle to brainstorm, draw, color and talk about their tools & color decisions with peers. WHY IS IT IMPORTANT? It helps to be able to take our own pictures in photoshop and know how to convert them from RASTER to VECTOR. This allows us to have student voice and original artwork, not copied. REQUIREMENTS: Size: 8.5x11 Medium: Adobe Illustrator CS6 & Adobe Photoshop CS6 Photo: Taken by yourself or a friend with the NIKON SLR CAMERA VOCABULARY: Show me how to use: Nikon Camera, upload photo, save high contrast photo in Photoshop, Illustrator tools: Live paint, pen, eyedropper, expand and paint bucket.
|