FINAL EXAM: |
| | |
| | |
| | |
| | |
First you must Manually Focus
First, take the manual focus tool (metal triangle) and position it on the cutting head so that it’s pointing down towards the material.
Next, put the machine into focus mode by pressing the “Focus” button on the control panel. This will display “Focus Mode” on the display screen and now the up and down arrow controls will control the height of the bed, adjust them so that the tip of the manual focus tool is touching the material that you are focusing on. It should look similar to the photo above.
CorelDraw
CorelDraw is a vector design program that is compatible only on the Windows Operating System. It is recommended that you design outside of CorelDraw and import your design. CorelDraw is only a means to job setup and printing, please avoid designing with it. Our laser cutter computer is located directly to the left of the machine, right click on .PDF file and open with CorelDraw. Make sure your page size matches the size of the material in the cutter.Use the guid to select the correct Vedtor and raster settings
DOCUMENT SIZE- our laser cutter has a 24” (width) x 18” (height) working area, please keep all documents sizes to a maximum size of 24” x 18”.
There are three different types of job types on the laser cutter.
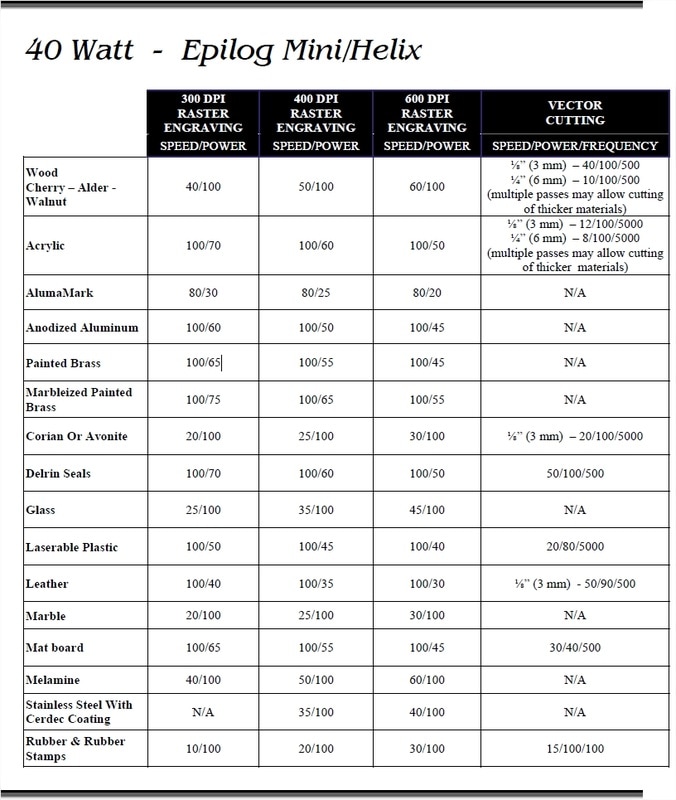
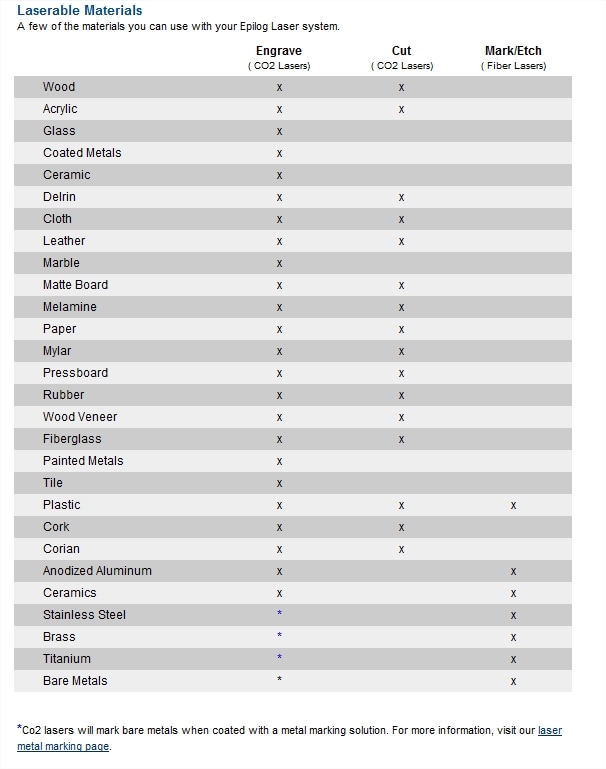
Please refer to Epilog’s Material Settings guide if you are unsure of the settings you need to use for your material.
Raster - used for only engraving onto material, (value scale using back & white contrast setting)
- It is best to manually focus the laser cutter on your material rather than using the autofocus feature, this will provide the best results.
- The cutting bed needs to be raised up or down to be in focus on your material, you will have to use the control panel to make this adjustment.
First, take the manual focus tool (metal triangle) and position it on the cutting head so that it’s pointing down towards the material.
Next, put the machine into focus mode by pressing the “Focus” button on the control panel. This will display “Focus Mode” on the display screen and now the up and down arrow controls will control the height of the bed, adjust them so that the tip of the manual focus tool is touching the material that you are focusing on. It should look similar to the photo above.
CorelDraw
CorelDraw is a vector design program that is compatible only on the Windows Operating System. It is recommended that you design outside of CorelDraw and import your design. CorelDraw is only a means to job setup and printing, please avoid designing with it. Our laser cutter computer is located directly to the left of the machine, right click on .PDF file and open with CorelDraw. Make sure your page size matches the size of the material in the cutter.Use the guid to select the correct Vedtor and raster settings
DOCUMENT SIZE- our laser cutter has a 24” (width) x 18” (height) working area, please keep all documents sizes to a maximum size of 24” x 18”.
There are three different types of job types on the laser cutter.
Please refer to Epilog’s Material Settings guide if you are unsure of the settings you need to use for your material.
Raster - used for only engraving onto material, (value scale using back & white contrast setting)
- Speed - This controls how fast the machine will engrave into the material. Slower speeds will result in a more power etch, because it will be spending more time on the material
- Power - This controls how much power (out of 35 Watts) you use to engrave. The higher that this is set, the more power will be used and the deeper the engraving will be.
- Speed - This controls how fast the machine will cut through the material. Slower speeds will result in a more power, because it will spend more time on the machine.
- Power - This controls how much power (out of 35 Watts) you use to cut. The higher that this is set, the more power will be used and the deeper the laser will cut into the material.
- Frequency - The laser is not a continuous stream of energy, it is actually pulsing down on your material. The rate at which it does so is determined by the frequency. You can set it from 20-5000 Hz (pulses per second).
- Vector Sorting - You select from “inside-out” which will cut the vectors in your design from the inside out, prevent larger objects with inside cuts to cut first. The other option is “optimize” which will cut your design in the most efficient way.
Sending the Job
Once you have entered in all of the settings you need, double check to make sure everything looks okay. Then press “OK”. You will then be brought back to the normal print menu, click “Apply” to save the settings in case you need to go back and make some small tweaks, otherwise you’ll have to start from scratch. Finally, select “Print” on the print menu and your job will be sent to the laser cutter and will show up on the display screen of the machine.
Once you have entered in all of the settings you need, double check to make sure everything looks okay. Then press “OK”. You will then be brought back to the normal print menu, click “Apply” to save the settings in case you need to go back and make some small tweaks, otherwise you’ll have to start from scratch. Finally, select “Print” on the print menu and your job will be sent to the laser cutter and will show up on the display screen of the machine.
CLO: I will explore the tools of indesign by creating a menu and referencing the tutorial and discussion creative decisions with peers.

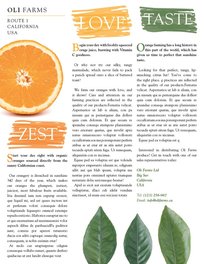
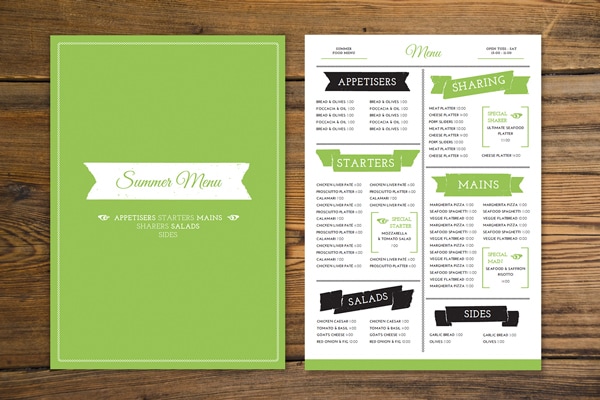
Find a menu you would like to recreate.
You may add colorful headings, pics, logos etc.
The text should be used from here.
You may crate your own but it will be a lot of typing.
When you find a menu you like copy, cut & paste it into a word .doc.
You will use InDesign to set up the templet. Be sure you select the correct size for your amount of text.
You may also download fonts & photos you need. (or take your own)
Use the logo given if you are recreating a real restaurant.
Have fun with it. Be creative.
Requirements: Choose one style
Single Front & Back
Double Folded in half F&B
Trifold Folded F&B
Include
Creative elements: fonts, prices, clip art or photos
Name of restaurant/logo
Address & phone number
Size: 8.5 x 11 or 11x17
CLO: I will research how tools work in INDesign by referencing tutorial and creating a creative resume, while discussing design decisions with peers
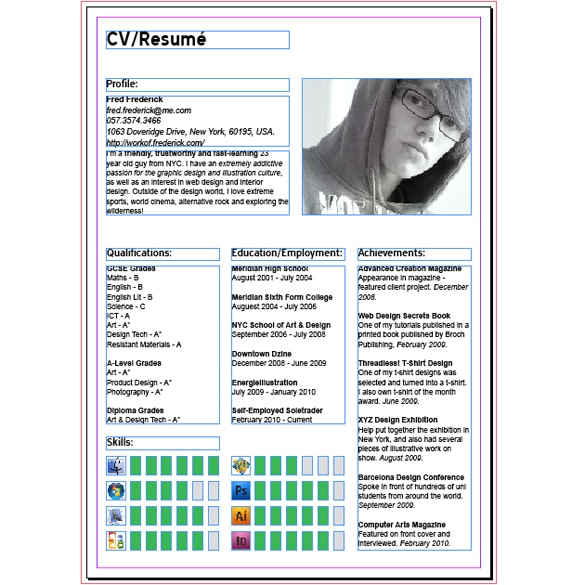
What is a creative resume?
In a competitive job market, creative resumes are a great way to show off your design skills and stand out from other applicants. Unfortunately, they're also a great way to annoy recruiters who are attempting to sift through hundreds of other resumes. When it comes down to it, it really just depends on the situation.
Where Are You Applying?
Creative resumes certainly aren't for everyone. Are you applying to a graphic design firm, a funky art gallery, or an uber-hip ad agency? Then yes, they might appreciate an eye-catching, well-designed resume that reflects your unique personality. Are you applying to be a pharmacist, an accountant, or a bank manager?Chances are, hiring managers will appreciate a traditional resume that gets straight to the point: your professional experience. Most importantly, follow instructions. If they ask for a basic resume in 12-point font, don't send them a hand-lettered masterpiece.
The Key(word) to Success
One of the biggest risks of using a creative resume isn't annoying an over-worked recruiter. Nope, it has to do with a little something called an Applicant Tracking System. A lot of companies now use these programs to screen the first round of resumes, and it's not uncommon for flashy, complicated resumes to be disregarded before any humans even lay eyes on them. Be sure to use relevant keywords in any kind of resume you use, and try to make them easy to pick up on. It never hurts to submit a basic resume in addition to your creative resume, particularly when applying online.
Get to the Point
If you do decide to submit a creative resume, remember that it's not a total free-for-all -- you should still abide by some basic resume-writing rules.Most importantly, information should be presented in a clear, concise, easy-to-read format. It shouldn't take recruiters five minutes to figure out your name because you wrote it in some hard-to-read font. Most people will spend no more than 60 seconds looking at a resume, so be sure that they can get the gist in that amount of time. Some other things to keep in mind:
Be Original !
For more info go to the site: http://www.careercast.com/career-news/are-creative-resumes-good-idea
Where Are You Applying?
Creative resumes certainly aren't for everyone. Are you applying to a graphic design firm, a funky art gallery, or an uber-hip ad agency? Then yes, they might appreciate an eye-catching, well-designed resume that reflects your unique personality. Are you applying to be a pharmacist, an accountant, or a bank manager?Chances are, hiring managers will appreciate a traditional resume that gets straight to the point: your professional experience. Most importantly, follow instructions. If they ask for a basic resume in 12-point font, don't send them a hand-lettered masterpiece.
The Key(word) to Success
One of the biggest risks of using a creative resume isn't annoying an over-worked recruiter. Nope, it has to do with a little something called an Applicant Tracking System. A lot of companies now use these programs to screen the first round of resumes, and it's not uncommon for flashy, complicated resumes to be disregarded before any humans even lay eyes on them. Be sure to use relevant keywords in any kind of resume you use, and try to make them easy to pick up on. It never hurts to submit a basic resume in addition to your creative resume, particularly when applying online.
Get to the Point
If you do decide to submit a creative resume, remember that it's not a total free-for-all -- you should still abide by some basic resume-writing rules.Most importantly, information should be presented in a clear, concise, easy-to-read format. It shouldn't take recruiters five minutes to figure out your name because you wrote it in some hard-to-read font. Most people will spend no more than 60 seconds looking at a resume, so be sure that they can get the gist in that amount of time. Some other things to keep in mind:
- Include your full name and contact information.
- Highlight your key professional accomplishments.
- Include dates so that recruiters have a general idea of your professional timeline.
Be Original !
For more info go to the site: http://www.careercast.com/career-news/are-creative-resumes-good-idea
EXAMPLES
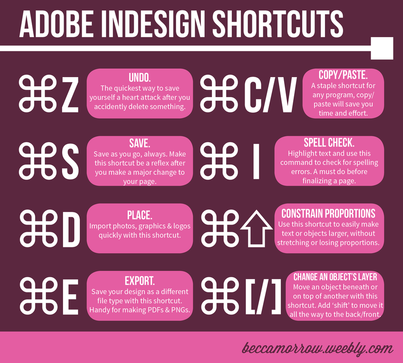
Get To know the tools...
Practice With This Tutorial First

Helpful Reminders
 |  |
Crash Course Video
Adobe InDesign CS6 Tutorials
Setting Type with InDesign
| | |
Magazine Layout Rules
| | | |
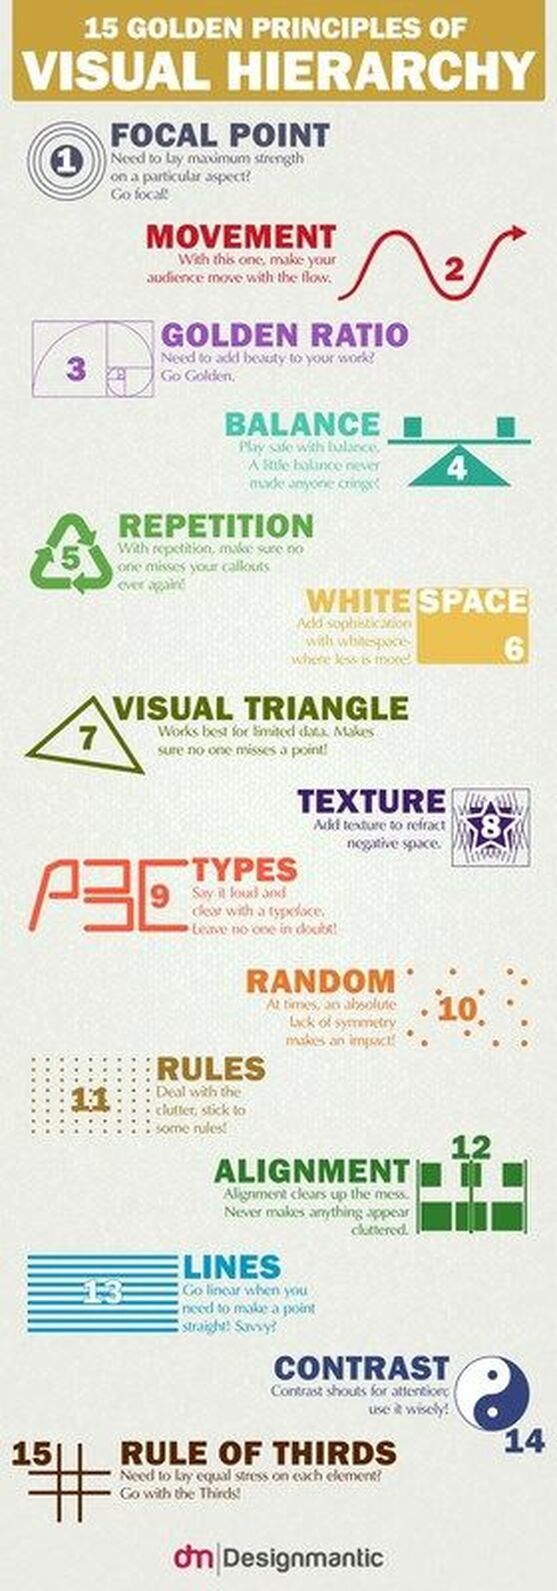
- Create your infographic for your target audience.
- Keep it simple.
- Keep it focused (one main idea).
- Show things visually.
- Make it easy to read. (font, color)
- Make it a manageable length and size.
- Add white space.
- Create a killer headline.
- Focus on the flow.
- Check your facts and figures (Cite your sources).
CLO:
I will create flat landscape by reading tutorial & listening to my peers and teacher. I will then create an infographic for a peer using this technique.
I will create flat landscape by reading tutorial & listening to my peers and teacher. I will then create an infographic for a peer using this technique.
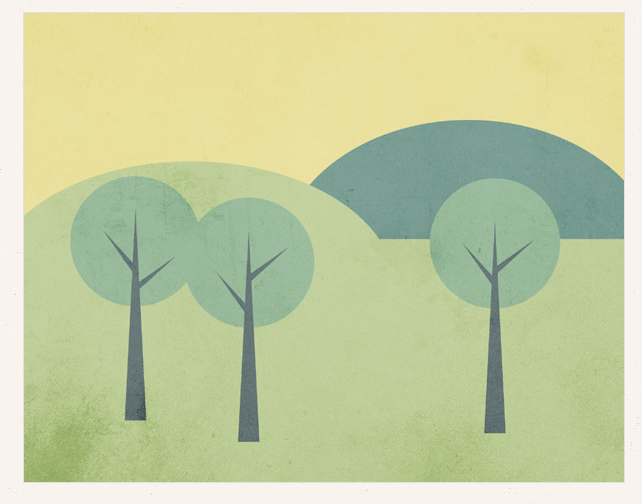
How To Create a Simple Landscape Scene in Illustrator
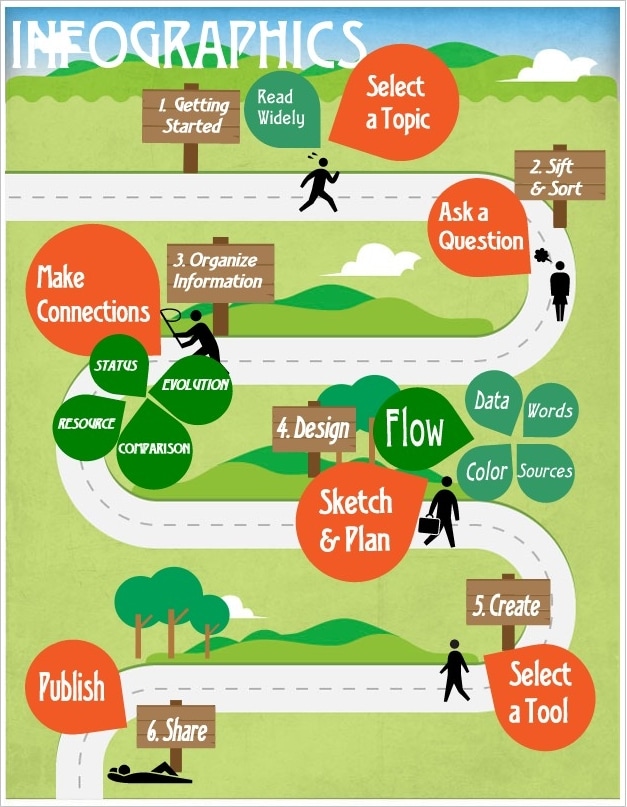
What is an Infographic?
A visual image such as a chart or diagram used to represent information or data.
| | |
CLO:
I will create a logo design for a T-shirt and get support through speaking & listening to my peers and teacher. The design must be original, no copyright images. You may however design a Lincoln t-shirt using the lancer logo. I will understand the screen printing process by creating my own print.
I will create a logo design for a T-shirt and get support through speaking & listening to my peers and teacher. The design must be original, no copyright images. You may however design a Lincoln t-shirt using the lancer logo. I will understand the screen printing process by creating my own print.
Check out the video if you missed the demonstration
Review The process:
Step #1: Design the image
- Choose a high-contrast image and crop your selection. Next, convert the image to black and white and if necessary, increase your contrast until you have a fairly simple-looking graphic.
- Ready the file for the vinyl cutterPrepare the file with the vinyl cutter’s. Add a box around the image, leaving at least 2"–3" of margin around all sides of your image so that the ink won’t seep around the edges.
- Cut a piece of vinyl the length and width of your screen, plus some extra on all sides, to ensure that it overlaps the frame. In the center of the vinyl, cut a rectangular hole that’s big enough for your image. This hole in the mask should be the only place where ink can flow through the screen.
- Peel the backing paper from the vinyl and place the mask on the table with its adhesive side facing up. Place the stretched screen frame onto the vinyl, bottom (T-shirt side) down, so it sticks to the adhesive. Make sure the vinyl is attached as neatly as possible to the frame. If your mask is bigger than your frame, make cuts from the edge of the frame to the edge of the vinyl to make it fold neatly.
- With a weeding tool or utility knife, remove the parts of the stencil where you want the ink to flow through.
- Be careful not to remove parts of the image where you want no ink to flow. To keep a complex design clear in your mind as you do the weeding, it’s helpful to refer to a black-and-white print of your image.
- Weed the whole image and leave it on the backing paper.
- Transfer tape is thinner and less adhesive than masking tape. It’s designed to hold the vinyl stencil together until you put it on a surface. Choose a roll of tape that’s just wide enough to cover your image.
- Get a friend’s help to make this step easier. One person applies the tape to the vinyl, smoothing it on gradually and evenly. The other person holds the roll with both hands, keeping an even tension on the tape so that it lays down on the vinyl without bubbles or wrinkles.
- You can use the squeegee to make sure the transfer tape goes on evenly, but your hands should be enough.
- Once you’ve covered the stencil with the tape, cut it off the roll.
- Remove the backing paper, making sure the vinyl stencil stays stuck to the transfer tape.
- Neatly and evenly apply the stencil to the top of the screen, making sure the image is completely inside the hole in the mask. Burnish or rub the stencil so that it’s completely adhered to the screen.
- Carefully remove the transfer tape from the stencil, peeling the tape back as flat as possible. If you peel the transfer tape at any angle much less than 180°, the vinyl tends to stay stuck to the tape.
- If the stencil doesn’t stick to the screen, fold the tape back over, rub the vinyl some more, then try peeling the tape again. Make certain that the stencil stays stuck to the screen.
- Fill in any gaps between the stencil and the mask with silver tape or paper. For future projects, when you want to switch to a new stencil, leave the mask on and just peel off the stencil.
- Remove the tags and stickers from the shirt. Brand new shirts seem to take the ink just fine.
- A small stack of newspapers works as well. The insert serves 2 purposes: It keeps the ink from bleeding to the back of the shirt, and it adds a bit of tension to the screen while printing, which helps you make a more crisp print.
- With the ink knife, put some screen printing ink into the well of the frame.
- Use the squeegee to draw the ink across your design.
- You want to use enough pressure to push the ink through the holes in the screen, but not so much pressure that the ink goes sideways beyond the stencil. This may take a bit of practice. Do some testing to find the right touch for inking the shirts.
- When you’re done printing, clean the screen promptly with water to remove the ink. You can take the insert out of the shirt, or leave it in during the drying process.
- You can speed the drying process up with a hair dryer.
- Once your shirt is totally dry, heat-set the ink by putting it in the t-shirt press for 25 seconds at 320 degrees
- WARNING: If you skip this step, you might ruin a whole load of laundry!
Heat Transfer process
Next Step in your vector Logo Design is
learning how to print, cut or engrave
CLO: Students will create vetor images and demonstrate how to apply it to chosen substrate. They will choose which technique to use based on screen print, Vinyl cutting or Laser engraving their final Logo.
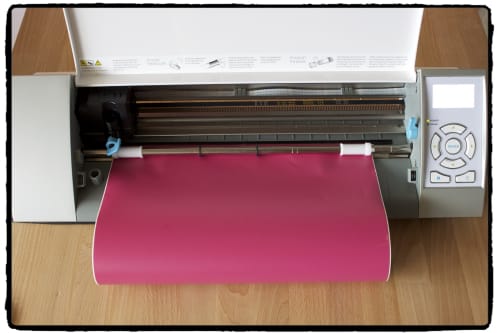
The vinyl cutter uses a small knife to precisely cut the outline of a picture into a sheet or piece of vinyl. The knife moves side to side and turns, while the vinyl is moved beneath the knife. The results from the cut process is an image cut into the material. The material is then 'weeded' where the excess parts of the picture are removed. It is possible to remove the positive parts, which would give a negative sticker, or you could weed the negative parts, giving a positive sticker. Removing the letters would be like removing the positive, giving a negative image of the word, etc.
The vinyl cutter is an entry level machine for every signage business. It is essential for sign making. Computer designed vector files with patterns and letters are directly cut on the roll of vinyl which you have mounted and feed into the vinyl cutter, through USB or serial cable. Vinyl cutters are mainly used to make signs, banners and advertisements. Advertisements seen on automobiles and vans are often made with vinyl cut letters. Vinyl cutters can also be used to cut out shapes from thin cardboard.
In addition to sign business, vinyl cutters are also commonly used for apparel decoration.[1] To decorate apparel, your vector design needs to be cut in mirror image, or reversed, weeded, and then heat applied using a commercial heat press for professional results,[2] or a hand iron for home use.
A vinyl cutter (or vinyl plotter) is a computer-controlled plotting device with a blade instead of a pen. A vector based design is created in a software program (usually Adobe Illustrator or Corel Draw) and then sent to the cutter where it cuts along the vector paths laid out in the design. The cutter is capable of moving the blade on an X and Y axis over the material, cutting it into any shape imaginable. Since the vinyl material comes in long rolls, projects with significant length like banners or billboards can be easily cut as well. The one major limitation with vinyl cutters is that they can only cut shapes from solid colors of vinyl. A design with multiple colors must have each color cut separately and then layered on top of each other as it is applied to the substrate. Also, since the shapes are cut out of solid colors, photographs and gradients cannot be reproduced with a standalone cutter.
Despite the limitations in the design process, the durability of solid, cut vinyl and its resistance to fading far outweigh any negatives in common applications. Also, in addition to the capabilities of the cutter itself, the adhesive vinyl comes in a wide variety of colors and materials including gold and silver foil, vinyl that simulates frosted glass, holographic vinyl, reflective vinyl, thermal transfer material, and even clear vinyl imbedded with real 24 carat gold leaf! (Often used in the lettering on fire trucks and rescue vehicles.)
The most successful businesses will use their vinyl cutter to offer both signage and custom apparel.
| | | |
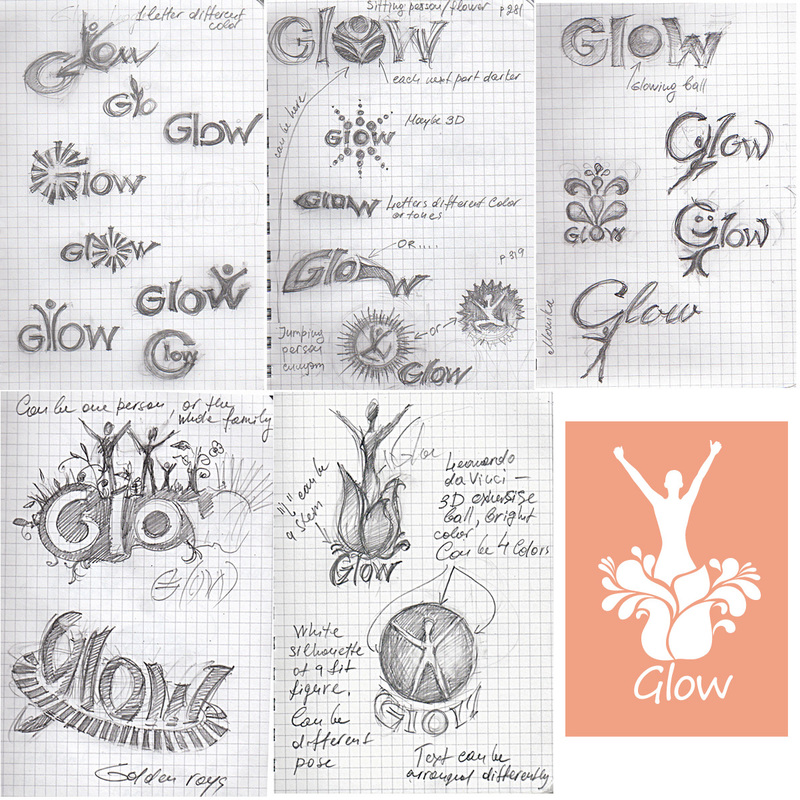
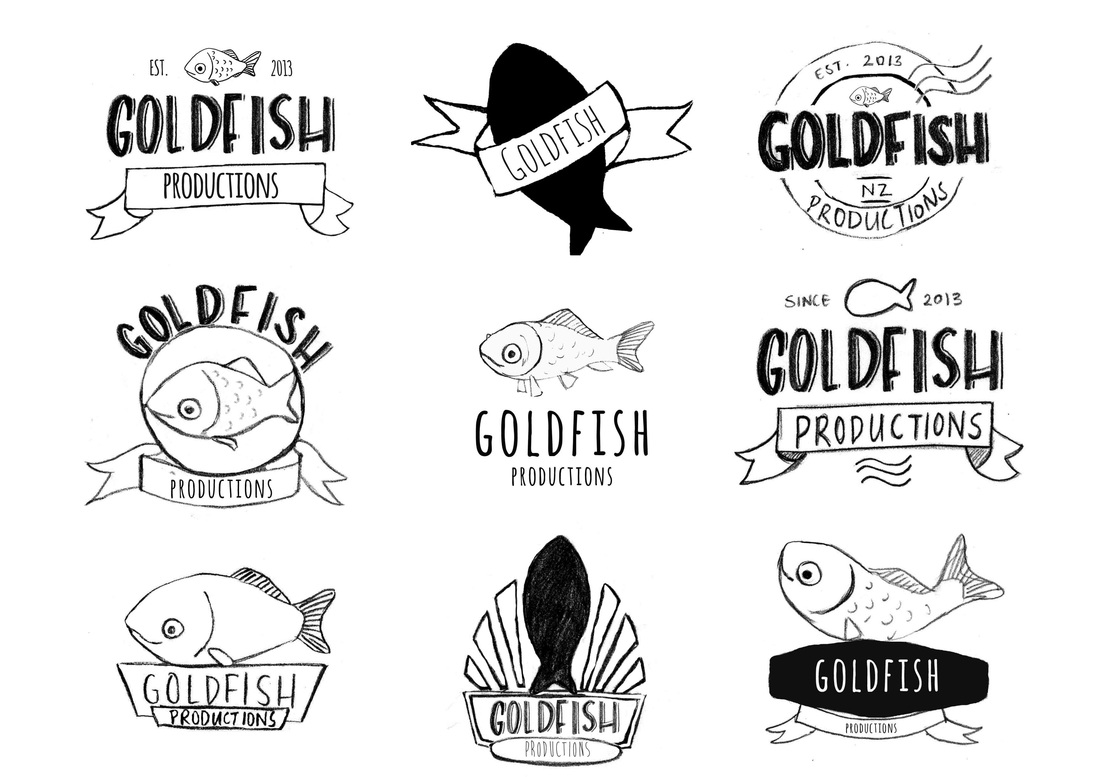
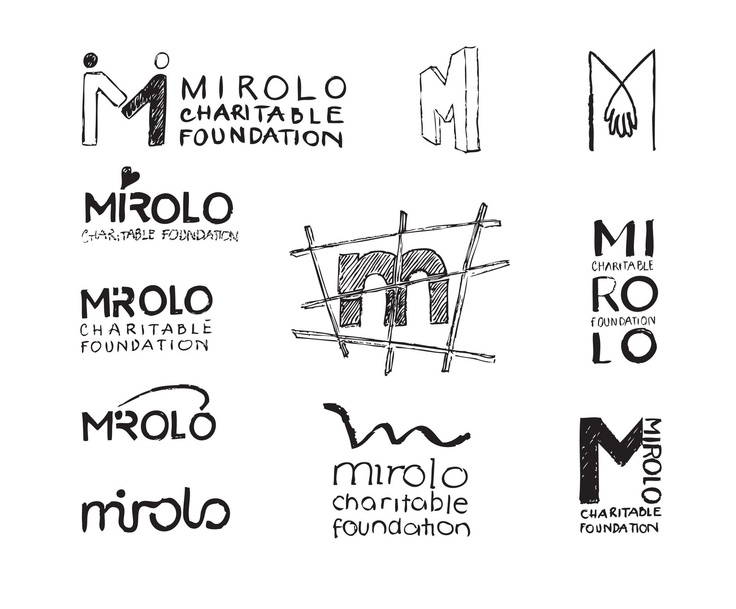
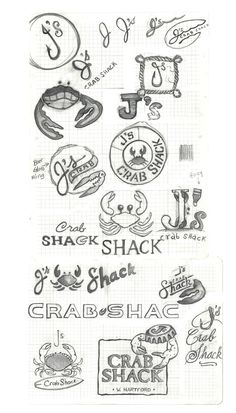
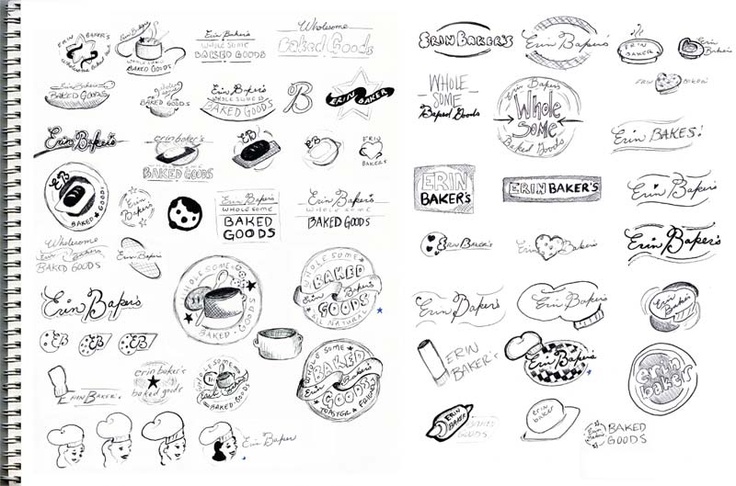
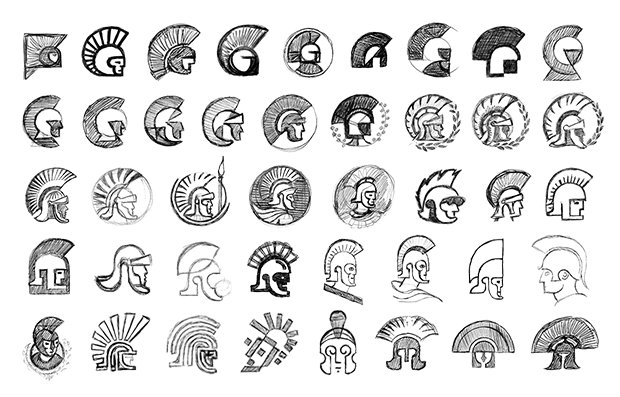
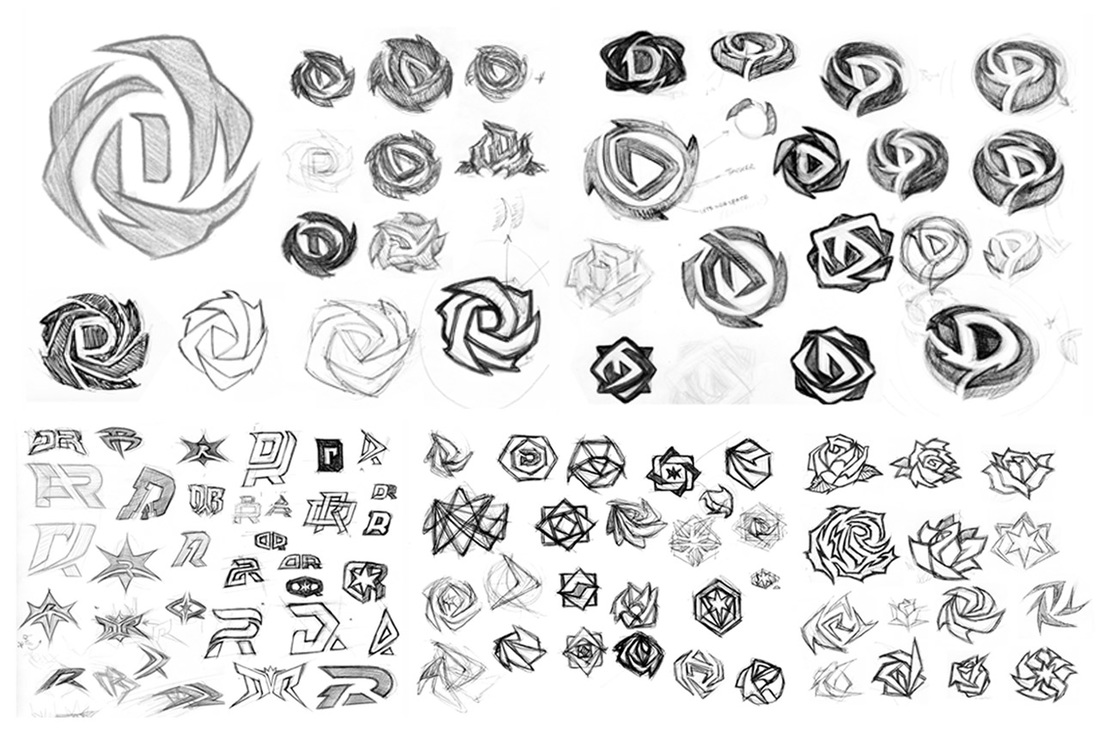
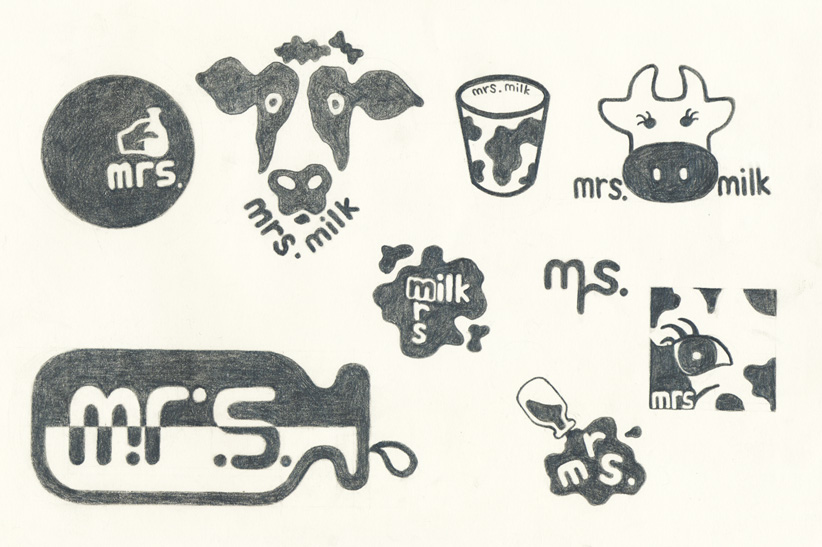
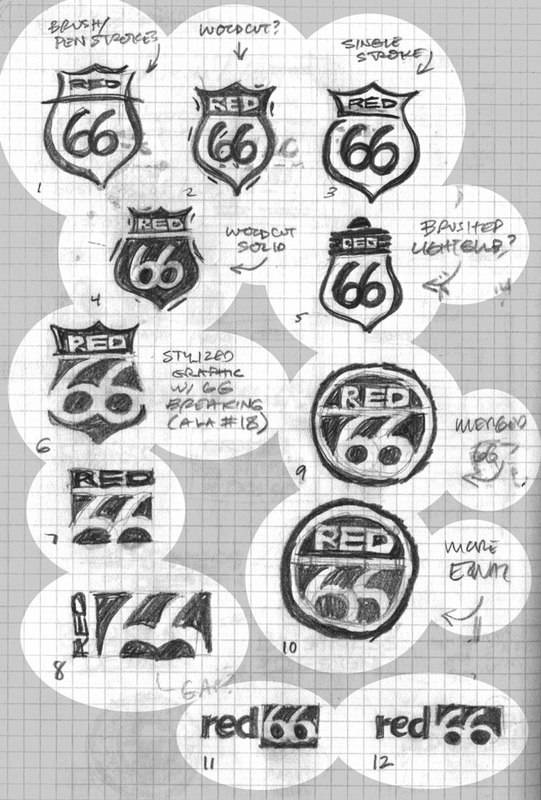
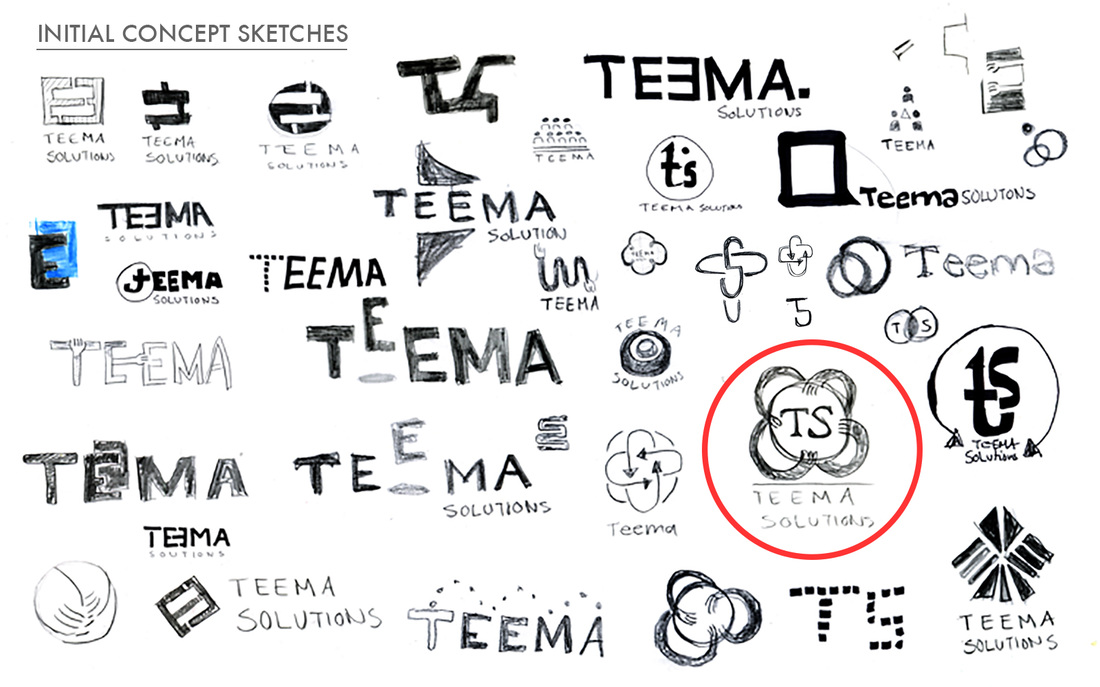
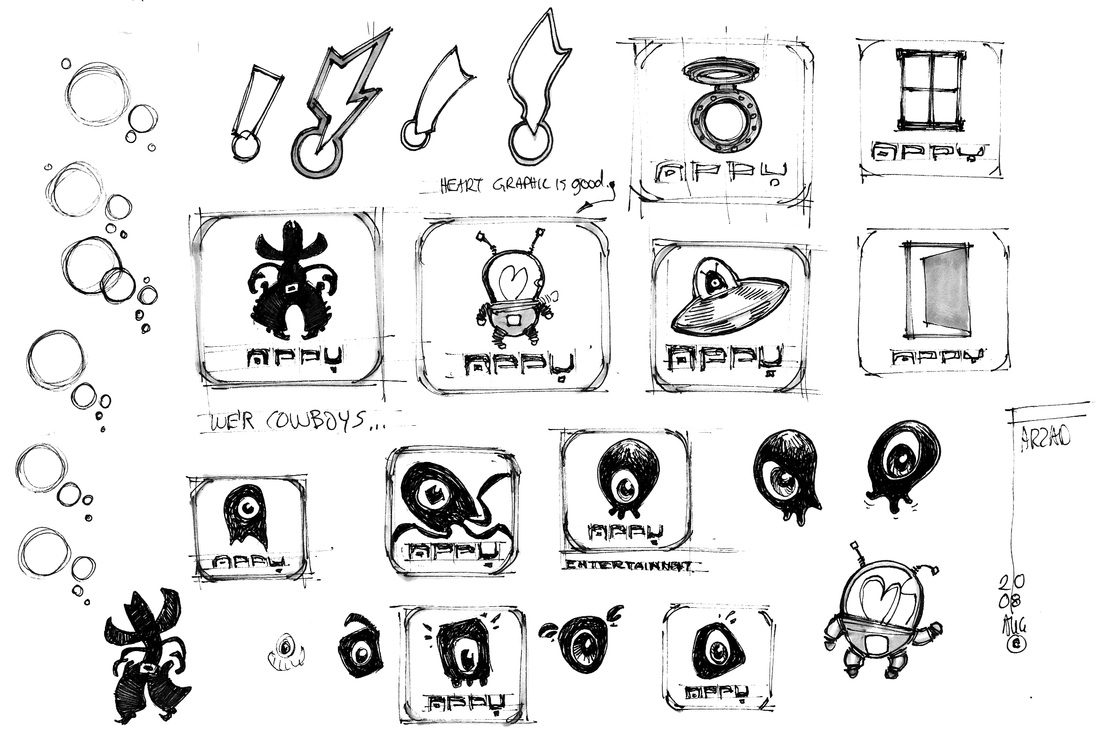
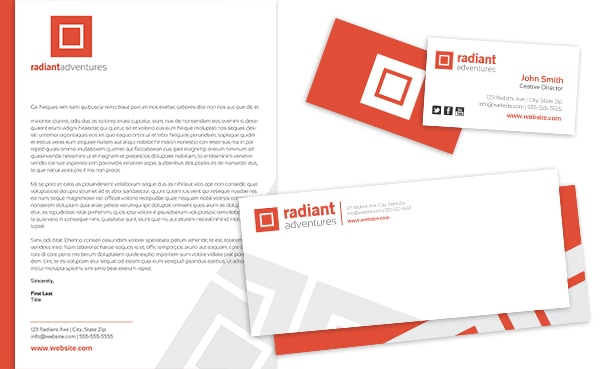
CLO: Students will participate in the creative process of brand identity from conception to final print, by researching logo design, drawing up multiple sketch & a conceptual plan for execution.
You are going to create a logo for your name or a real business. Yes, you may use a family business or club/team at Lincoln. You are going to create an identity based on client needs, location and audience. The entire project will consist of many parts. You must use the design cycle for each part. Right now we are focusing on logo design.
You may use Word, Adobe Photoshop, Illustrator, Weebly, Silhouette, google, any digital cameras or art materials needed. You choose what is best for the job. Please put art materials back on cupboard when finished. You may leave sketches on my desk.
Project MUST HAVES !!!!
You may use Word, Adobe Photoshop, Illustrator, Weebly, Silhouette, google, any digital cameras or art materials needed. You choose what is best for the job. Please put art materials back on cupboard when finished. You may leave sketches on my desk.
Project MUST HAVES !!!!
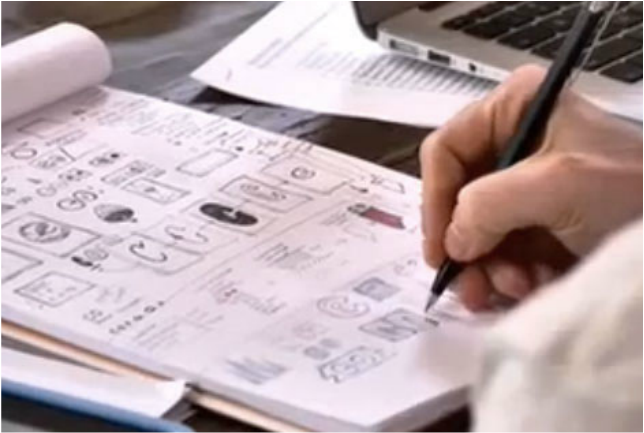
- proof of research (ideas, likes, similar businesses) make a folder on your desktop of your inspiration
- plans/sketches of ideas (at least 20 thumbnails, may be digital or hand drawn) examples below
- revisions and critiques (notes of changes)
- Final logos in black and white, saved in .jpeg & .ai format (to be uploaded to dropbox & google classroom)